2024 Project Recap

I think going forward I will use this blog to do yearly recaps of my projects. That way I know I will get at least 1 new post a year :D

Here is 2024!

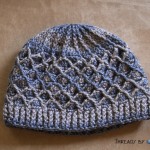
From top to bottom, left to right.

Mauve-A-Lous Duster Cardi – I LOVE how this turned out. My favorite project of the year.

Sail Away Kimono – Most difficult and required significant pattern adjustments, but worth it in the end.

Blockparty – My favorite pattern / yarn combo, Toni yarn, with a Tinna pattern, chef’s kiss!

Elmore Blanket – The surprisingly only baby blanket I made last year.

Solomon’s Knot Tank Top – The “I really hope this doesn’t fuzz a ton when I wear it this summer, I may have used the wrong type of yarn for this” project, stay tuned for verdict in project notes.

Easy Essentials Tee – The “Wrong side is the Right side” project, I liked the reverse side look better than the front, so that is how I will wear it :)

Coraza shawls!

Ava Shell Tank Top – I went to Flock Fiber Festival and only allowed myself to find a yarn to use for the top most color of this top because I ran out of all the others.

More Coraza shawls!

Coffee Bean Beanie – The Jury is still out on this one, I am worried it will stretch I think I made the brim too wide, but I love the colors and pattern, would make again.

Easy Ribbed Chunky Sweater – Most at Risk of partial frogging, I seamed the collar and arm holes a bit too tight, I really like it but I took away the stretch in those places, I need to fix that. cause I really want to wear this more.

And there we have it!

Coraza crazy!

Safe to say, I have become a huge fan of this Coraza pattern. Created by the super talented Tinna who is also very well known for her mosaic crochet patterns. I needed a project to work on while our daughter takes her taekwondo classes, and since we are there for 2 hours 2-3 days a week on average I get a lot of time to work on them. So far I have completed 6 shawls while at the taekwondo school, the mauve one in the top row, which was a gift for my sister, and all the ones in row 2 and the last one.

The first 3 I completed prior, but led me to realize how perfect this pattern is for on the go. No row counting, no stitch counting, crazy simple stitch repeats of dc’s and chains. I use a 3.5mm hook, the red one if you also use the Clover Amore set and I mainly use Hobbii yarns like Sultan, Dahlia or Twister, or Yarn Art Flowers cakes would also be great for this. A single cake is the perfect amount. I add the tassels at home after I finish the last round, which lead to a bit of a bead acquiring frenzy for a short period of time, but I think I am good now, I have enough variety to select from and it is one of my favorite parts of the project.

To call out the elephant in the room, it has been years since I posted here, but I never stopped crocheting, I just relied more on Ravelry to keep my notes for projects, which will continue to be the case primarily, but I just thought it would be nice to post an update to say I am still here and still crocheting. Thanks for stopping by!

My Chevron Lace Cardigan

IMG_3233

I had 3 skeins of this wonderfully colorful DK yarn I got at Stitches West from Zen Yarn Garden (color way OOAK in Serenity DK) and thought to make an attempt at a basic short sleeve cardigan. I hunted around for awhile and after reading reviews from makers, wanting something that was a basic repeat and could be customized fairy easily in case I needed to adjust the sizing. After a bit of debate I settled on this Chevron Lace Cardigan by milobo for  a few reasons. 1 – it is worked from top down with (after a slight mod) no cutting/joining any panels, 2 – it’s a basic chevron repeat which can be easily modified from the start to the size that you want and 3 – it was not too lace-y or thick with the yarn I wanted to use.

Admittedly I am not one to like doing gauge swatches, but for this I thought I would do one, so I did, and after 30 rows, realized it was too short on the front panels and the arm holes were off, so I had to frog it back to the very beginning to add a few more rows, but such is life and learning, but at least doing that shows me that while it is good to do a swatch, sometimes you just won’t know exactly until you are half way done and that’s just the way it is!

I did a fair amount of editing to the pattern once I got past making the arm holes (using the FSC edit some of the makers suggested so you did not have to cut/join your yarn). I have copied below what I wrote for my Ravelry notes here:

“I followed the pattern to a degree, I started with 56 chains using a 5.5 hook with DK yarn on the thin side. I started the arms at row 13 and used the FSC option noted by a few makers of this pattern instead of breaking and rejoining, this worked out very well.

As I went I needed the front sides to be a little wider so for the first/last 20 sts on each side I did 1 increase and kept it for the remainder of the body. So 5 DC then ch 2 instead of 4 like the normal repeat.

After I got the length good I went around with a row of HDC around the bottom and switched to DC’s up the middle and then back to HDC around the collar to give it some width for buttons and an edge. I did this 2 times around.

The sleeves I did 4 rounds of DC then 3 rounds of HDC, then 2 rounds of shells. I also did 2 rounds of shells on the bottom edge as a finishing. Then added the black buttons about 2 inches apart. I didn’t block it prior to taking the photos so the front edge curls a bit, not sure if I will (too much work for something I don’t feel I really need)”

IMG_3223

Preferably I wish I could have made it about 2-3 inches longer on the body, but it still fits just fine and is not too tight or loose, which I am super happy about. The buttons are 1 inch black plastic buttons that I put on about 2 inches apart because I noticed after I finished my edging it wasn’t laying exactly flat and was flaring out a bit at the bottom, so the buttons fix all of that which I am fine with. Overall I am super happy with the final result, it fits well and I will certainly wear it!

Here are a bunch of pictures I took of the completed cardigan with some closeups of sections.

IMG_3244

IMG_3245

IMG_3243

IMG_3240

IMG_3239

IMG_3238

IMG_3237

IMG_3235

IMG_3234

IMG_3231

IMG_3228

IMG_3227

IMG_3226

Newly Completed Items

Here are some photos of some newly completed items I have made. The first is a completed photo of the Afghan stitch scarf I was working on earlier. This scarf was super fun to make because both sides of the scarf are interesting and could be the ‘front’. Check out my shop listing for more detailed photos.

I also finished my Catherine Wheel Stitch hat. Also recently new to my shop, it turned out cute I like the alternating colors too.

I have used this stitch before but did not get a great photo of the hat so I did another using just navy blue but I plan to make more colors of this hat, it uses what is called a Butterfly Stitch, and I watched this video to give me a start, however I did not follow the pattern exactly to get the hat I made.

I will be posting an update with photos on my squares blanket, I have more colors done so look for that later this week!

Afghan Stitch Scarf

I was watching a video about how to do an Afghan Stitch and thought I could make a skinny scarf with the pattern using only 10 stitches across.

Here is the video:

Here is a photo of my scarf so far:

20130507-185411.jpg

I am really liking the texture this pattern makes, will probably add some fringe to the ends once its done too!

Recent Fun Finds

I stumbled on this great tutorial for a Catherine Wheel stitch yesterday:

So I decided to try it on a hat:

IMG_0001

I made 2 more squares for my blanket too, so not real huge leap forward there yet but more yarn arrived today for that project so thats great!

Another cool tutorial about crochet cats!

Diamond Hats Pattern

One of the first patterns I fell in love with is this awesome diamond pattern. At first it was rather daunting to try and figure out how in the world this thing comes together, but once I got the hang of it I cranked out a whole bunch of them.

Here are a few that I started out with first:

Diamond Hat Single Color

Berry

Diamond Hat Single Color

Medium Blue

Diamond Hat Single Color

Leaf Green

I learned this pattern from a great tutorial I found here: Hodge Podge Crochet

I then played around with adding different colors:

Diamond Hat Triple Color

Diamond Hat Triple Color

I couldn’t stop there so I played around more with some different ways to do different colors too:

Diamond Hat Duo Color

Diamond Hat Duo Color

Diamond Hat Peacock Overlay

Diamond Hat Peacock Overlay

Diamond Hat Overlay

Diamond Hat Overlay

Diamond Hat Striped

Diamond Hat Striped

Diamond Hat Chunky Duo Color

Diamond Hat Chunky Duo Color

I love this pattern it is so versatile so I will be continuing to experiment with this pattern and post up more as I finish them. Hope you like them!